Vue生命周期
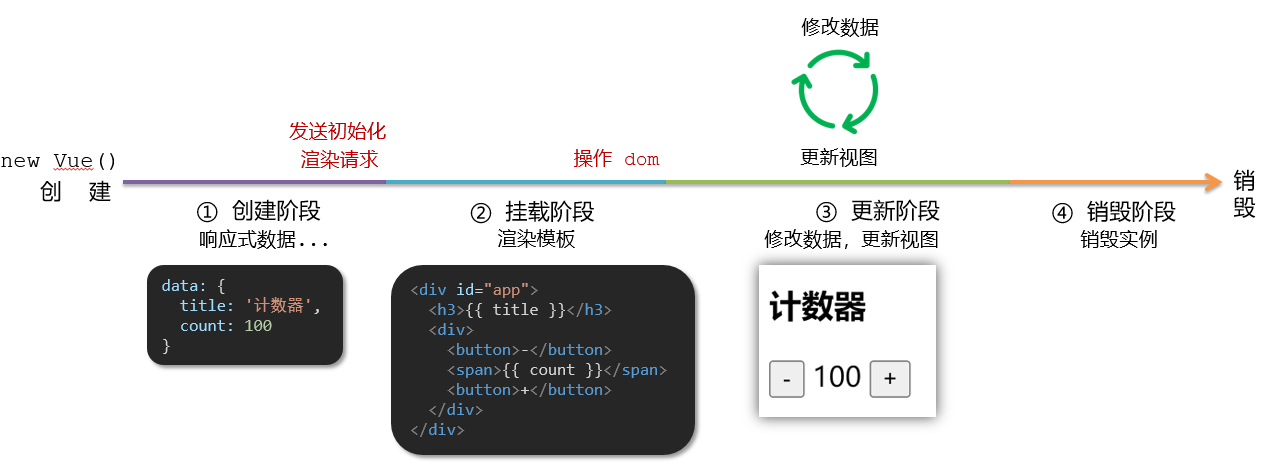
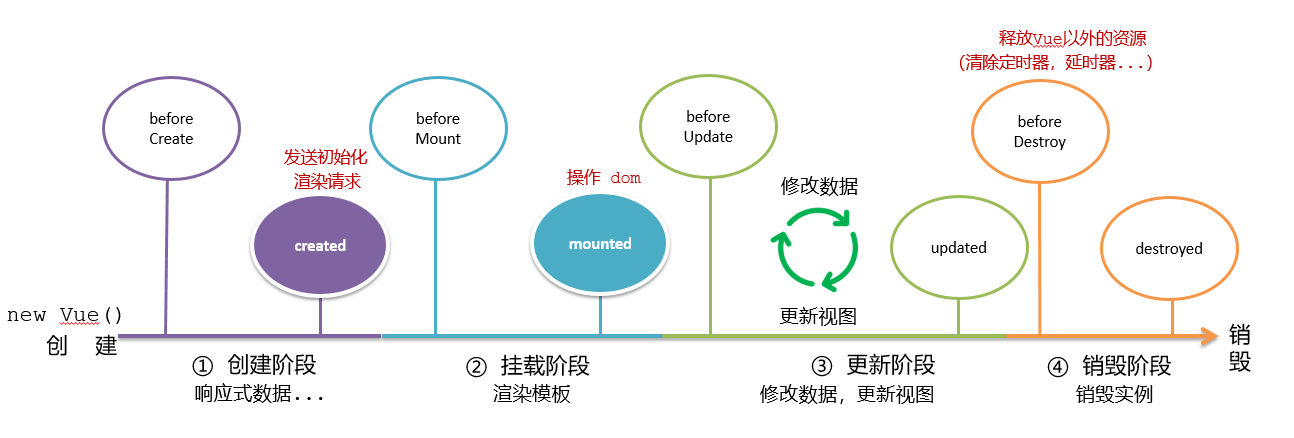
思考:什么时候可以发送初始化渲染请求?(越早越好)什么时候可以开始操作dom?(至少dom得渲染出来)
Vue生命周期:就是一个Vue实例从创建 到 销毁 的整个过程。
生命周期四个阶段:① 创建 ② 挂载 ③ 更新 ④ 销毁
1.创建阶段:创建响应式数据
2.挂载阶段:渲染模板
3.更新阶段:修改数据,更新视图
4.销毁阶段:销毁Vue实例
Vue生命周期钩子
Vue生命周期过程中,会自动运行一些函数,被称为【生命周期钩子】→ 让开发者可以在【特定阶段】运行自己的代码
1
2
3
4
5
6
7
8
9
10
11
12
13
14
15
16
17
18
19
20
21
22
23
24
25
26
27
28
29
30
31
32
33
34
35
36
37
38
39
40
41
42
43
44
45
46
47
48
49
50
51
52
53
54
55
56
| <body>
<div id="app">
<h3>{{ title }}</h3>
<div>
<button @click="count--">-</button>
<span>{{ count }}</span>
<button @click="count++">+</button>
</div>
</div>
<script src="https://cdn.jsdelivr.net/npm/vue@2/dist/vue.js"></script>
<script>
const app = new Vue({
el: '#app',
data: {
count: 100,
title: '计数器'
},
beforeCreate () {
console.log('beforeCreate 响应式数据准备好之前', this.count)
},
created () {
console.log('created 响应式数据准备好之后', this.count)
},
beforeMount () {
console.log('beforeMount 模板渲染之前', document.querySelector('h3').innerHTML)
},
mounted () {
console.log('mounted 模板渲染之后', document.querySelector('h3').innerHTML)
},
beforeUpdate () {
console.log('beforeUpdate 数据修改了,视图还没更新', document.querySelector('span').innerHTML)
},
updated () {
console.log('updated 数据修改了,视图已经更新', document.querySelector('span').innerHTML)
},
beforeDestroy () {
console.log('beforeDestroy, 卸载前')
console.log('清除掉一些Vue以外的资源占用,定时器,延时器...')
},
destroyed () {
console.log('destroyed,卸载后')
}
})
</script>
</body>
|
生命周期钩子小案例
1.在created中发送数据
1
2
3
4
5
6
7
8
9
10
11
12
13
14
15
16
17
18
19
20
21
22
23
24
25
26
27
28
29
30
31
32
33
34
35
36
37
| <body>
<div id="app">
<ul>
<li v-for="(item, index) in list" :key="item.id" class="news">
<div class="left">
<div class="title">{{ item.title }}</div>
<div class="info">
<span>{{ item.source }}</span>
<span>{{ item.time }}</span>
</div>
</div>
<div class="right">
<img :src="item.img" alt="">
</div>
</li>
</ul>
</div>
<script src="https://cdn.jsdelivr.net/npm/vue@2/dist/vue.js"></script>
<script src="https://cdn.jsdelivr.net/npm/axios/dist/axios.min.js"></script>
<script>
const app = new Vue({
el: '#app',
data: {
list: []
},
async created () {
const res = await axios.get('http://hmajax.itheima.net/api/news')
this.list = res.data.data
}
})
</script>
</body>
|
2.在mounted中获取焦点
1
2
3
4
5
6
7
8
9
10
11
12
13
14
15
16
17
18
19
20
21
22
23
24
25
26
27
28
| <body>
<div class="container" id="app">
<div class="search-container">
<img src="https://www.itheima.com/images/logo.png" alt="">
<div class="search-box">
<input type="text" v-model="words" id="inp">
<button>搜索一下</button>
</div>
</div>
</div>
<script src="https://cdn.jsdelivr.net/npm/vue@2/dist/vue.js"></script>
<script>
const app = new Vue({
el: '#app',
data: {
words: ''
},
mounted () {
document.querySelector('#inp').focus()
}
})
</script>
</body>
|
工程化开发和脚手架
1.开发Vue的两种方式
- 核心包传统开发模式:基于html / css / js 文件,直接引入核心包,开发 Vue。
- 工程化开发模式:基于构建工具(例如:webpack)的环境中开发Vue。
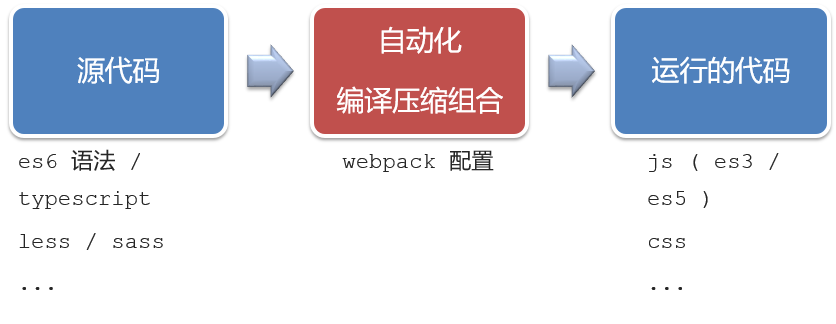
工程化开发模式优点:
提高编码效率,比如使用JS新语法、Less/Sass、Typescript等通过webpack都可以编译成浏览器识别的ES3/ES5/CSS等
工程化开发模式问题:
- webpack配置不简单
- 雷同的基础配置
- 缺乏统一的标准
为了解决以上问题,所以我们需要一个工具,生成标准化的配置
2.脚手架Vue CLI
基本介绍:
Vue CLI 是Vue官方提供的一个全局命令工具
可以帮助我们快速创建一个开发Vue项目的标准化基础架子。【集成了webpack配置】
好处:
- 开箱即用,零配置
- 内置babel等工具
- 标准化的webpack配置
使用步骤:
- 全局安装(只需安装一次即可) yarn global add @vue/cli 或者 npm i @vue/cli -g
- 查看vue/cli版本: vue –version
- 创建项目架子:vue create project-name(项目名不能使用中文),创建时要求选择vue3还是vue2,本文基于vue2进行讲解
- 启动项目:yarn serve 或者 npm run serve(命令不固定,找package.json)
项目目录介绍和运行流程
1.项目目录介绍
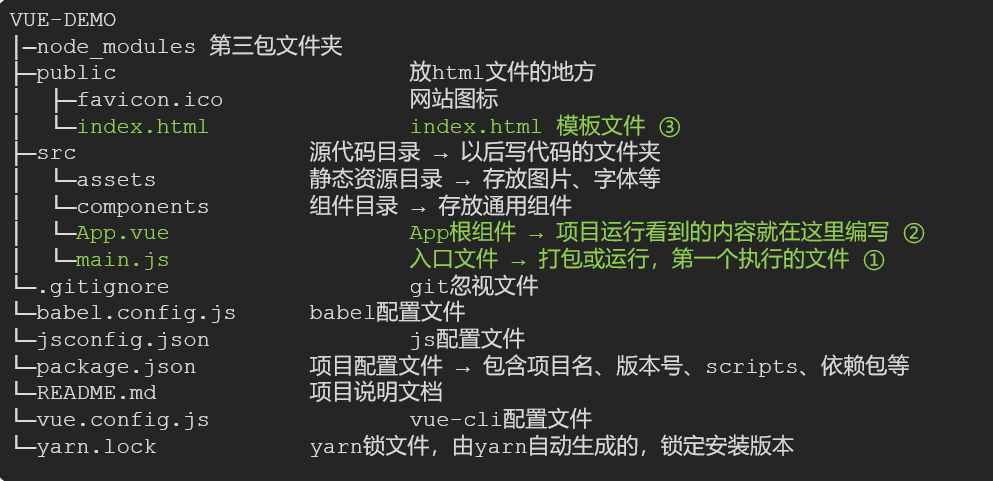
虽然脚手架中的文件有很多,比较重要的三个文件
- main.js 入口文件
- App.vue App根组件
- index.html 模板文件
2.运行流程
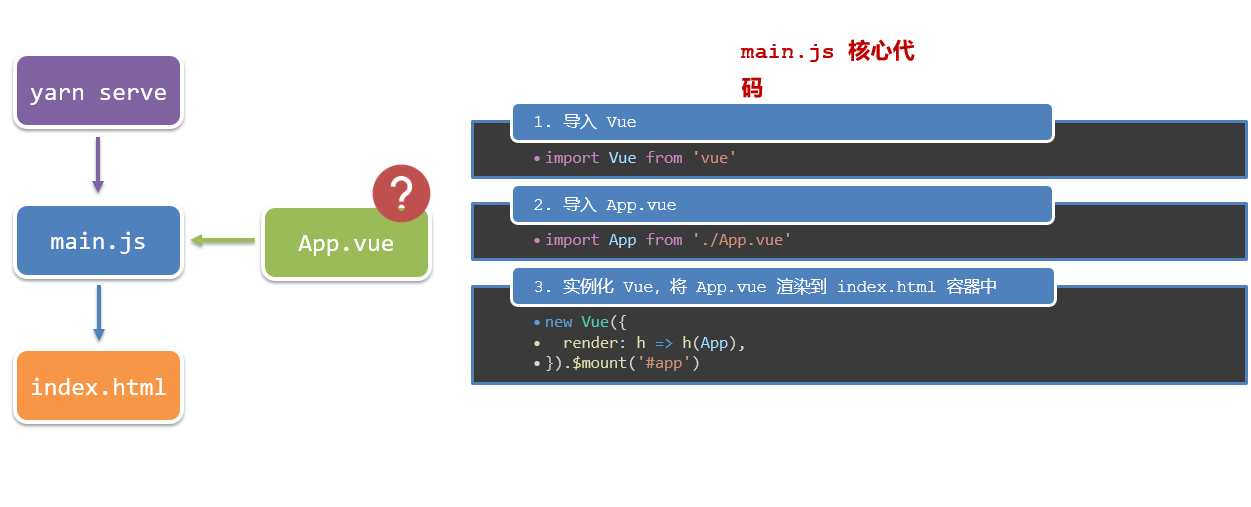
组件化开发
组件化:一个页面可以拆分成一个个组件,每个组件有着自己独立的结构、样式、行为。
好处:便于维护,利于复用 → 提升开发效率。
组件分类:普通组件、根组件。
比如:下面这个页面,可以把所有的代码都写在一个页面中,但是这样显得代码比较混乱,难易维护。咱们可以按模块进行组件划分
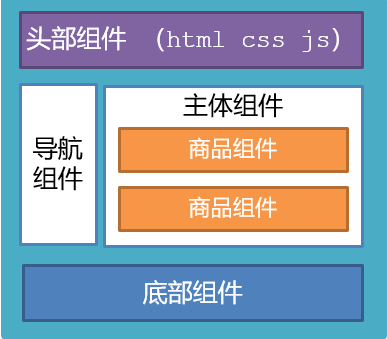
根组件 App.vue
1.根组件介绍
整个应用最上层的组件,包裹所有普通小组件
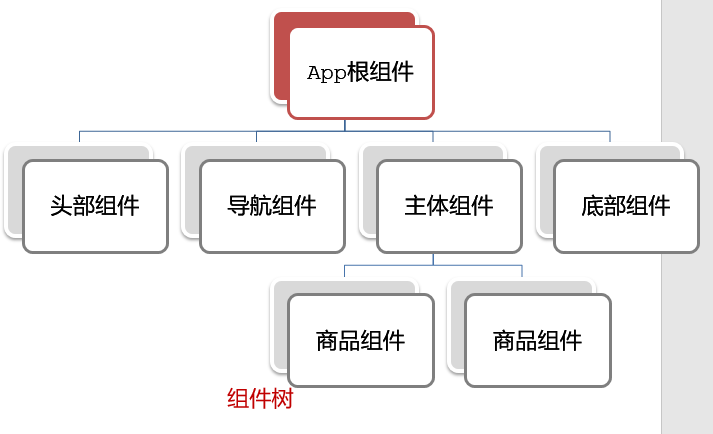
2.组件是由三部分构成

普通组件的注册使用-局部注册
1.特点:
只能在注册的组件内使用
2.步骤:
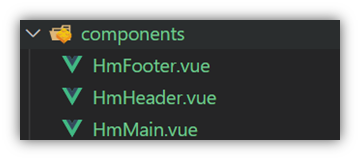
- 创建.vue文件(三个组成部分)
- 在使用的组件内先导入再注册,最后使用
3.使用方式:
当成html标签使用即可 <组件名></组件名>
4.注意:
组件名规范 —> 大驼峰命名法, 如 HmHeader
5.语法:
1
2
3
4
5
6
7
8
9
10
11
|
import HmHeader from './components/HmHeader'
export default {
components: {
HmHeader:HmHeaer,
}
}
|
6.练习
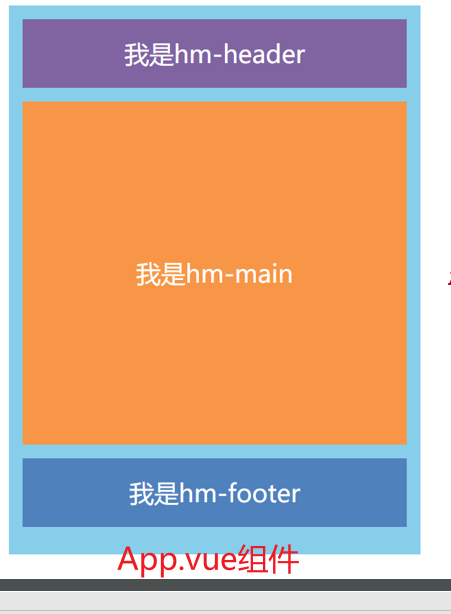
在App组件中,完成以下练习。在App.vue中使用组件的方式完成下面布局
1
2
3
4
5
6
7
8
9
10
11
12
13
14
15
16
17
18
19
20
21
22
23
|
<template>
<div class="hm-header">
我是hm-header
</div>
</template>
<script>
export default {
}
</script>
<style>
.hm-header {
height: 100px;
line-height: 100px;
text-align: center;
font-size: 30px;
background-color: #8064a2;
color: white;
}
</style>
|
1
2
3
4
5
6
7
8
9
10
11
12
13
14
15
16
17
18
19
20
21
22
23
24
|
<template>
<div class="hm-main">
我是hm-main
</div>
</template>
<script>
export default {
}
</script>
<style>
.hm-main {
height: 400px;
line-height: 400px;
text-align: center;
font-size: 30px;
background-color: #f79646;
color: white;
margin: 20px 0;
}
</style>
|
1
2
3
4
5
6
7
8
9
10
11
12
13
14
15
16
17
18
19
20
21
22
23
|
<template>
<div class="hm-footer">
我是hm-footer
</div>
</template>
<script>
export default {
}
</script>
<style>
.hm-footer {
height: 100px;
line-height: 100px;
text-align: center;
font-size: 30px;
background-color: #4f81bd;
color: white;
}
</style>
|
使用以上的组件
1
2
3
4
5
6
7
8
9
10
11
12
13
14
15
16
17
18
19
20
21
22
23
24
25
26
27
28
29
30
31
32
33
34
35
36
37
38
| <template>
<div class="App">
<HmHeader></HmHeader>
<HmMain></HmMain>
<HmFooter></HmFooter>
</div>
</template>
<script>
import HmHeader from './components/HmHeader.vue'
import HmMain from './components/HmMain.vue'
import HmFooter from './components/HmFooter.vue'
export default {
components: {
HmHeader: HmHeader,
HmMain,
HmFooter
}
}
</script>
<style>
.App {
width: 600px;
height: 700px;
background-color: #87ceeb;
margin: 0 auto;
padding: 20px;
}
</style>
|
普通组件的注册使用-全局注册
1.特点:
全局注册的组件,在项目的任何组件中都能使用
2.步骤
- 创建.vue组件(三个组成部分)
- main.js中进行全局注册
3.使用方式
当成HTML标签直接使用
<组件名></组件名>
4.注意
组件名规范 —> 大驼峰命名法, 如 HmHeader
5.语法
Vue.component(‘组件名’, 组件对象)
例:
1
2
3
4
|
import HmButton from './components/HmButton'
Vue.component('HmButton', HmButton)
|
6.练习
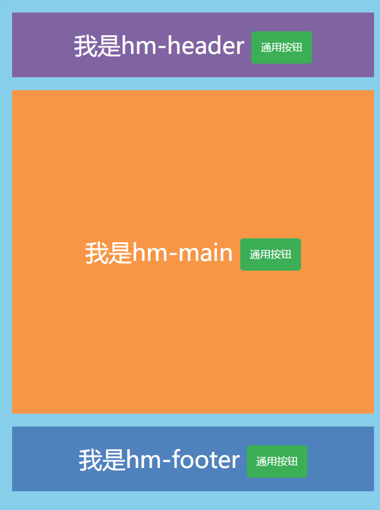
在以下3个局部组件中是展示一个通用按钮
1
2
3
4
5
6
7
8
9
10
11
12
13
14
15
16
17
18
19
20
21
22
23
| <template>
<button class="hm-button">通用按钮</button>
</template>
<script>
export default {
}
</script>
<style>
.hm-button {
height: 50px;
line-height: 50px;
padding: 0 20px;
background-color: #3bae56;
border-radius: 5px;
color: white;
border: none;
vertical-align: middle;
cursor: pointer;
}
</style>
|
在main.js中进行注册
1
2
3
4
5
6
7
8
9
10
| import Vue from 'vue'
import App from './App.vue'
import HmButton from "./components/hm-button.vue"
Vue.config.productionTip = false
Vue.component('HmButton', HmButton)
new Vue({
render: h => h(App),
}).$mount('#app')
|
在其他组件中直接使用,不需要进行局部注册
1
2
3
4
5
6
7
8
9
10
11
12
13
14
15
16
17
18
19
20
21
22
23
24
| <template>
<div class="hm-main">
我是hm-main
<HmButton/>
</div>
</template>
<script>
export default {
}
</script>
<style>
.hm-main {
height: 400px;
line-height: 400px;
text-align: center;
font-size: 30px;
background-color: #f79646;
color: white;
margin: 20px 0;
}
</style>
|


