WPF高级任务栏
基本使用
因为任务栏是程序级别的,所以要在App.xaml中进行设置
1
2
3
4
5
6
7
8
9
10
11
12
13
14
15
16
17
18
19
20
21
22
23
24
25
26
27
28
29
30
31
32
| <Application x:Class="WpfApp10.App"
xmlns="http://schemas.microsoft.com/winfx/2006/xaml/presentation"
xmlns:x="http://schemas.microsoft.com/winfx/2006/xaml"
xmlns:local="clr-namespace:WpfApp10"
StartupUri="MainWindow.xaml">
<JumpList.JumpList>
<JumpList
ShowFrequentCategory="True"
ShowRecentCategory="True"
JumpItemsRejected="JumpList_JumpItemsRejected"
JumpItemsRemovedByUser="JumpList_JumpItemsRemovedByUser">
<JumpTask
Title="标题1"
ApplicationPath="C:\Windows\notepad.exe"
Arguments="readme.txt"
CustomCategory="组别"
Description="描述"
IconResourceIndex="14"
IconResourcePath="C:\Windows\System32\imageres.dll"
WorkingDirectory="C:\Users\54302\Desktop" />
<JumpTask
Title="标题2"
ApplicationPath="C:\Windows\notepad.exe"
Arguments="readme.txt"
CustomCategory="DEMO 2"
Description="Open readme.txt in Notepad."
IconResourceIndex="15"
IconResourcePath="C:\Windows\System32\imageres.dll"
WorkingDirectory="C:\Users\54302\Desktop" />
</JumpList>
</JumpList.JumpList>
</Application>
|
在任务栏上右击

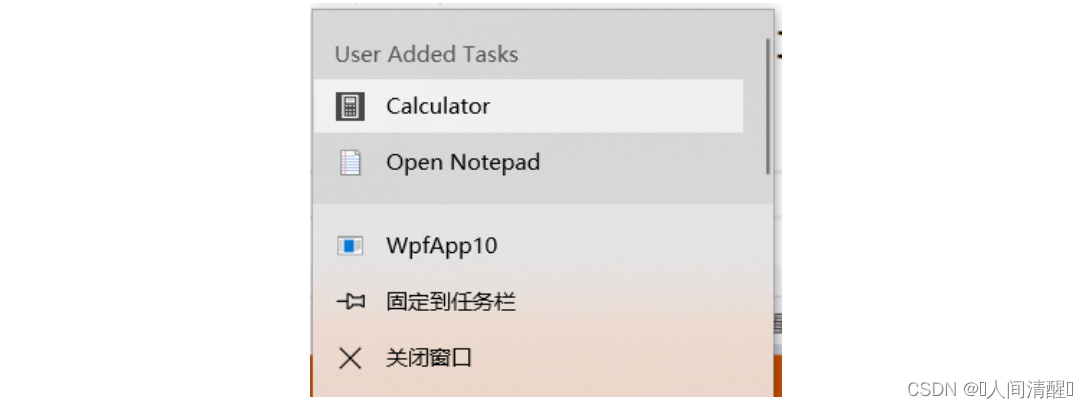
同样也可以使用C#来实现,在主窗口中设置
1
2
3
4
5
6
7
8
9
10
11
12
13
14
15
16
17
18
19
20
21
22
23
24
25
| private void Window_Loaded(object sender, RoutedEventArgs e)
{
JumpList jumpList = new JumpList();
JumpTask jumpTask1 = new JumpTask();
jumpTask1.ApplicationPath = Path.Combine(Environment.GetFolderPath(Environment.SpecialFolder.SystemX86), "calc.exe");
jumpTask1.IconResourcePath = Path.Combine(Environment.GetFolderPath(Environment.SpecialFolder.SystemX86), "calc.exe");
jumpTask1.Title = "Calculator";
jumpTask1.Description = "Open Calculator.";
jumpTask1.CustomCategory = "User Added Tasks";
jumpList.JumpItems.Add(jumpTask1);
JumpTask jumpTask2 = new JumpTask();
jumpTask2.ApplicationPath = @"C:\Windows\notepad.exe";
jumpTask2.Arguments = "readme.txt";
jumpTask2.CustomCategory = "User Added Tasks";
jumpTask2.Description = "Open readme.txt in Notepad.";
jumpTask2.IconResourcePath = @"C:\Windows\System32\imageres.dll";
jumpTask2.IconResourceIndex = 14;
jumpTask2.WorkingDirectory = @"C:\Users\Public\Documents";
jumpTask2.Title = "Open Notepad";
jumpList.JumpItems.Add(jumpTask2);
jumpList.Apply();
}
|
动态添加多个项
1
2
3
4
5
6
7
8
9
10
11
12
13
14
15
16
17
18
19
20
21
22
23
24
25
| private void Btn_Click(object sender, RoutedEventArgs e)
{
JumpList jumpList = JumpList.GetJumpList(Application.Current);
if (jumpList == null)
{
jumpList = new JumpList();
}
JumpTask jumpTask2 = new JumpTask();
jumpTask2.ApplicationPath = @"C:\Windows\notepad.exe";
jumpTask2.Arguments = "readme.txt";
jumpTask2.CustomCategory = "User Added Tasks";
jumpTask2.Description = "Open readme.txt in Notepad.";
jumpTask2.IconResourcePath = @"C:\Windows\System32\imageres.dll";
jumpTask2.IconResourceIndex = 14;
jumpTask2.WorkingDirectory = @"C:\Users\Public\Documents";
jumpTask2.Title = "打开记事本";
jumpList.JumpItems.Add(jumpTask2);
jumpList.Apply();
JumpList.SetJumpList(Application.Current, jumpList);
}
|
上面代码关闭软件后上次加入的列表还会存在,但是在点击新增后,之前添加的列表项会被清空,原因在于jumpList = new JumpList();这句代码。可以将jumpList进行序列化进行存储,每次打开存储的文件。
任务栏进度条
1
2
3
4
5
6
7
8
9
10
11
12
13
14
15
16
17
| <Window x:Class="WpfApp10.MainWindow"
xmlns="http://schemas.microsoft.com/winfx/2006/xaml/presentation"
xmlns:x="http://schemas.microsoft.com/winfx/2006/xaml"
xmlns:d="http://schemas.microsoft.com/expression/blend/2008"
xmlns:mc="http://schemas.openxmlformats.org/markup-compatibility/2006"
xmlns:local="clr-namespace:WpfApp10"
mc:Ignorable="d"
Title="MainWindow" Height="201.22" Width="300" >
<Window.TaskbarItemInfo>
<TaskbarItemInfo x:Name="taskBarInfo"/>
</Window.TaskbarItemInfo>
<UniformGrid Columns="3">
<Button x:Name="btn" Content="开始" Click="Btn_Click" Width="60" Height="40" />
<Button x:Name="pause" Content="暂停" Click="Pause_Click" Width="60" Height="40" />
<Button x:Name="cancel" Content="取消" Click="Cancel_Click" Width="60" Height="40"/>
</UniformGrid>
</Window>
|
1
2
3
4
5
6
7
8
9
10
11
12
13
14
15
16
17
18
19
20
21
22
23
24
25
26
27
28
29
30
31
32
33
34
35
36
37
38
39
40
41
42
| DispatcherTimer dispatcherTimer;
private void Start_Click(object sender, RoutedEventArgs e)
{
taskBarInfo.ProgressState = TaskbarItemProgressState.Paused;
}
private void Process()
{
dispatcherTimer = new DispatcherTimer();
dispatcherTimer.Interval = TimeSpan.FromSeconds(0.1);
dispatcherTimer.Tick += DispatcherTimer_Tick;
dispatcherTimer.Start();
}
int i = 1;
private void DispatcherTimer_Tick(object sender, EventArgs e)
{
taskBarInfo.ProgressValue = i++ / 10.0;
}
private void Pause_Click(object sender, RoutedEventArgs e)
{
dispatcherTimer.Stop();
taskBarInfo.ProgressState = TaskbarItemProgressState.Paused;
}
private void Cancel_Click(object sender, RoutedEventArgs e)
{
taskBarInfo.ProgressState = TaskbarItemProgressState.Indeterminate;
}
private void Btn_Click(object sender, RoutedEventArgs e)
{
taskBarInfo.ProgressState = TaskbarItemProgressState.Normal;
Process();
}
|
任务栏重叠图标
在已有任务栏图标上加上下图像,如开始暂停,来描述不同的状态。
taskBarItem.Overlay = new BitmapImage( new Uri("play.png"));
或者在xaml中设置Overlay<TaskbarItemInfo x:Name="taskBarInfo" Overlay="icon.png" >
本人在Win10下测试,没有效果,有知道原因的小伙伴在评论区说一下
缩略图按钮
鼠标悬浮在任务栏上,提供一种快速控制的方式。

1
2
3
4
5
6
7
8
9
10
| <Window.TaskbarItemInfo>
<TaskbarItemInfo x:Name="taskBarItem">
<TaskbarItemInfo.ThumbButtonInfos>
<ThumbButtonInfo ImageSource="play.png" Description="Play"
Click="cmdPlay_Click"></ThumbButtonInfo>
<ThumbButtonInfo ImageSource="pause.png" Description="Pause"
Click="cmdPause_Click"></ThumbButtonInfo>
</TaskbarItemInfo.ThumbButtonInfos>
</TaskbarItemInfo>
</Window.TaskbarItemInfo>
|
缩略图裁剪
某些情况下,缩略图不需要显示整个窗口,只需要聚焦在窗口中的某一区域,则可以使用缩略图裁剪。
1
2
3
4
5
6
7
8
9
10
11
|
Button cmd = (Button)sender;
Point locationFromWindow = cmd.TranslatePoint(new Point(0, 0), this);
double left = locationFromWindow.X;
double top = locationFromWindow.Y;
double right = LayoutRoot.ActualWidth - cmd.ActualWidth - left;
double bottom = LayoutRoot.ActualHeight - cmd.ActualHeight - top;
taskBarItem.ThumbnailClipMargin = new Thickness(left, top, right, bottom);
|


